Instagram

Monday, September 30, 2013

More handle making

The handle is now mostly finished. It will be next weekend probably before I can continue working on it.
But here are two interesting pictures.


Here you see the handle clamped into the tailvice so I can reach most parts. A special carvers vice would be better, but I get along with this setup. An old scraper is jammed in the sawblade slot before clamping in the vice. On the bench the tools I use. A very coarse Bahco rasp, which works quickly but leaves a nasty surface. Then some rasps from Iwasaki. They work slower but leave a much better surface. Some round files for the tight spots and lots of sandpaper strips, cut from bandsander rolls. These are very tough, don't break so easilly like normal sandpaper. First I draw the outline of the contour on the flat side of the handle with a pencil. Then I use the rasps to round the handle up till these contourlines. It's important to make a nice smooth curve with the rasps. The sandpaper won't change it much anymore. After the rasps it's a matter of using the sandpaper in a sequence of grits. Making sure to remove all scratches and blemishes from the previous one.  It's no sin to trace back on your steps when you find an ugly spot which needs more work with a coarser grit.

The sharp V-groove in the top and at the bottom of the handle can't be reached with sandpaper, so I use a sharp chisel to cut these.

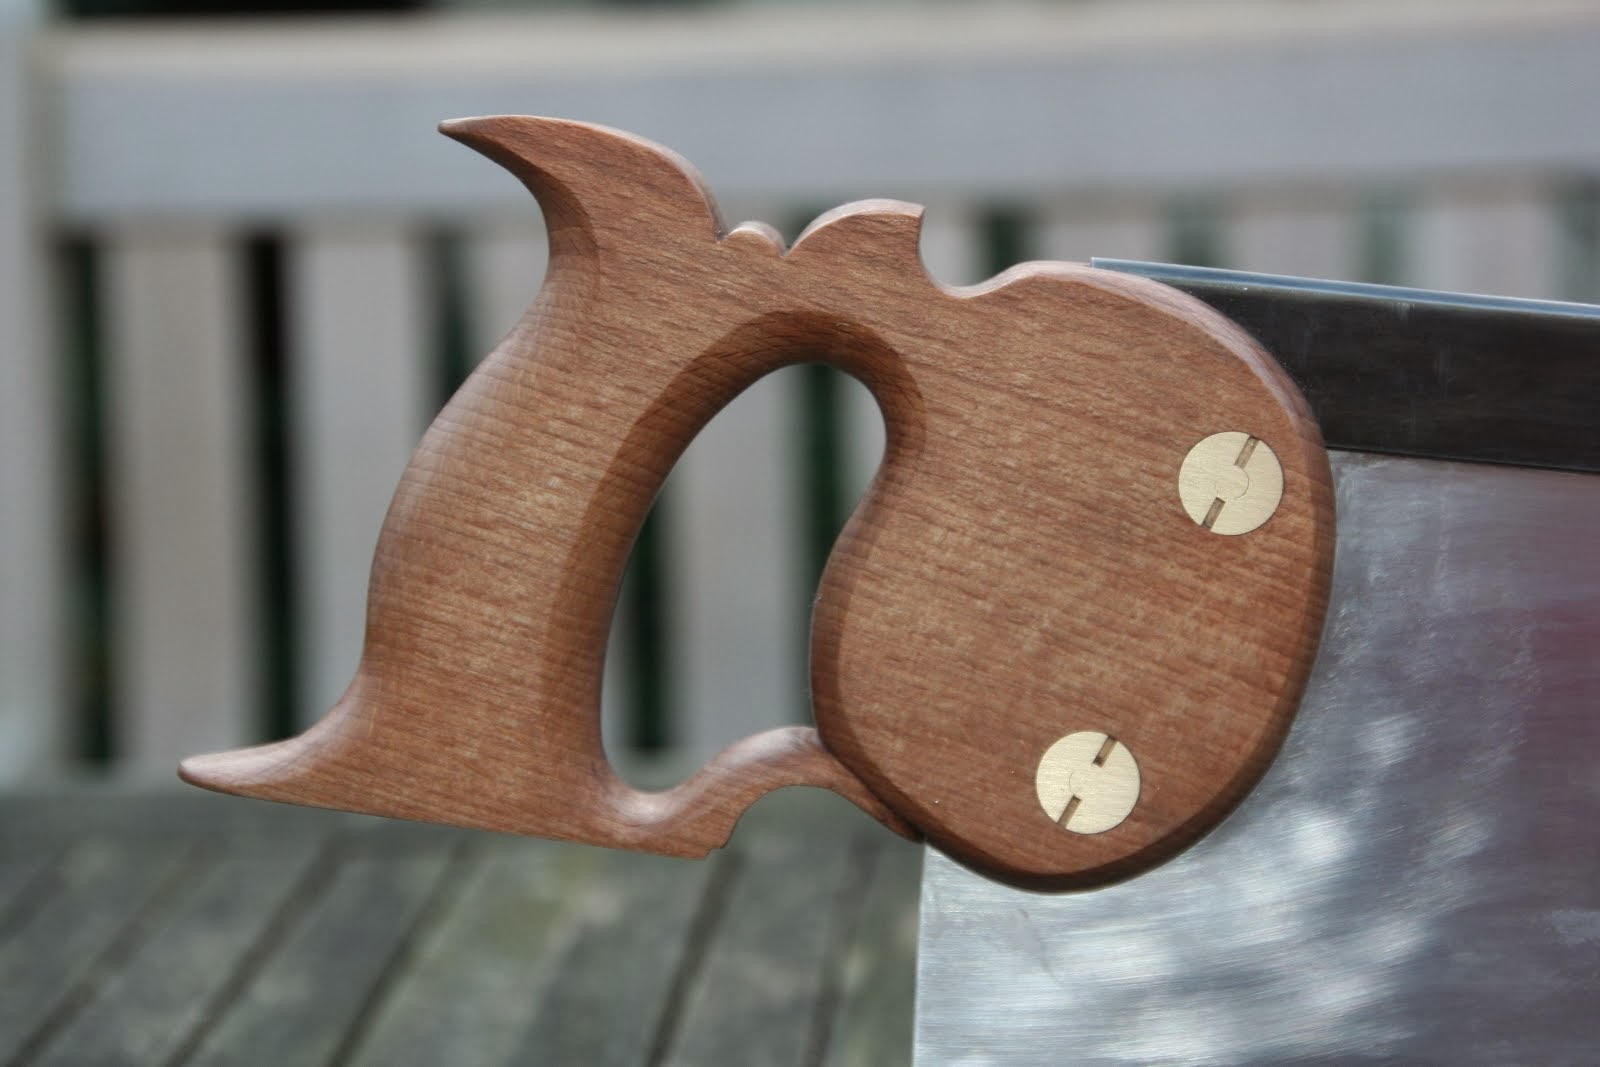
The second picture shows the saw screws with split nuts. I made these on a metal lathe from brass. It's mostly standard turning. The head of the screw and the nuts are just slightly oversized 11mm with a very slight taper to the inward side. I hope this will help to get a good tight fit in the wood. The square part is hand filed. And the screw slot in the nuts is also handwork. First I cut with a hacksaw, then widen the slot with a narrow file.


Saturday, September 28, 2013

Handle making

Still busy. Somehow it always turns out to be a mess on the bench, no matter how small the project is.


Clamping a handle is a challenge. This is just one possibility.

Monday, September 16, 2013

First beginnings

Metalwork comes first when making a saw. The brass back has allready been folded some two years ago. A collegue helped me with a bad-ass metal brake and a hydraulic press. Still, the fold wasn't completely closed. Brass work hardenes, which means it becomes very stiff when you bend it. This is easilly remidied however, you just have to heat it up and let it cool off again. It doesn't need to get redhot, I made it as hot as I could with a simple butane burner. Then hammering with a big hammer on an anvil.

Hammering works very well, you have to watch out to keep it straight though. So, you hammer one side or the other until you are happy. I got a bit over enthousiastic though, and made it totally flat. No space for the sawblade anymore! So I had to labourously hammer an old knife in the fold again to unbend it a little. Broke the knife, no fun. Hammering also causes dents, so I had to do a lot of work with files and a bandsander. At the same time I made the taper along the length, about 2 mm less width in the front. And I filed and sanded some chamfers and the nice little round detail at the very tip. Overall, a lot of work for such a little saw.


Inserting the blade into the back was troublesome too. No matter how hard I hit the blade, it wouldn't go any deeper! After all that hammering the blade wasn't quite straight and flat anymore. Luckily I had read a very good article about this problem, and it was no trouble to correct it. Straightening the blade. Have a look around in this blog, it is full of advice.

Next part of a saw is the handle. And you need a bit of wood for that. Original is quarter sawn beech. I have plenty of beech, not all quarter sawn though. I didn't want to dig through the woodstack too much, so I grabbed an offcut from a beech 10x10 cm beam. The wood is a little peculiar, there is quite some spalting going on. I had to do some creative sawing and planing to circumvent a couple of cracks and to make it as QS as possible. This is not the most perfect piece of wood, but this is a workmans saw. And I am sure no workman would have thrown away a decent piece of beech because of some spalting. I am not sure yet how I will saw the handle from this piece of wood, but this is one possibility. (The one on the right is a paper copy!)


Saw making again?

Now the table is finished, I want to spend some time on smaller projects. I've made two saws in the past (Tenon saw), and that was fun. Not easy, but fun. I still have some parts left over, several folded brass backs and a bit of spring steel plate. One of the backs is very short and would be perfect for making a dovetail saw. The steel plate I have is a bit thick for a dovetail saw, so I ordered some 0.45mm plate on ebay in Germany.

I have been looking around for some nice patterns. There is plenty available on the net, but I have a very mundane taste. A lot of woodworkers like very ornate sawhandles, but for me they should be as simple as possible. When I first saw a picture of the Dalaway saw, I was intrigued, but not yet very enthousiastic. It is probably one of the oldest surviving dovetail saw, made in Birmingham in the 18th century. (From a book, woodworking tools in the 18th century).

Very nice little saw, but the handle does look a bit dismembered in this picture. I was contemplating several other designs, like the old Kenyon saws. But then I saw a picture of the saw made by George Wilson, the retired master instrument maker in the museum "Colonial Williamsburg" in America. Apart from the musical instruments, they were making all kinds of 18th century tools to be used in the museum. While George didn't think much of this design, I was smitten by its wonderfull shape, the little details and the kind of unorthodox low hang angle of the handle.


Some details. Canted sawplate, which means its is lower a the front. A tapered spine, quite a bit narrower in the front then at the handle end. 0.4 mm thin plate, so mine is still a little too thick. I don't know its size, it looks like the plate is 9" long.  My plate is 8", so it will look a bit different. Overall I am totally stoked to give it a try. It won't be a carbon copy, but I'll give it a honest try.


Saturday, September 14, 2013

The dining table is finished!

It took some time, but..... (drum rol) here it is, the wallnut, live edge, made by handtools only, dining table!