Instagram

Tuesday, February 24, 2015

New endvise

When I made my workbench I installed an endvise with one of these generic woodworkers vices. With a big wooden jaw and a hole for a moving dog, it was very usefull together with the dogholes in the benchtop itself. It looked like this.


It worked well enough as an endvice but never perfectly so. And clamping objects in this vice for example for carving was pretty miserable. This type of vise really likes racking and sagging. And to move the jaw a reasonable amount I had to wind the handle an unreasonable number of turns. All in all, this was the part of the bench I didn't really like.

So I bought an old Record 52, years ago, stored it in a dusty corner and never got round to it. After moving the workshop to the garage last summer I started working in the new shop without any endvise at all. And I know, viseless woodworking is all the rage nowadays, but I missed it nonetheless.

At the moment I am somehow not in the mood for fine woodworking, which is a brilliant excuse to tackle little jobs like this. After clearing out the area around the bench and cleaning the bench itself I turned it over. Its a long time since I've seen my bench upside down!


After removing the old hardware it was time to make a plan for installing the new vise in a good spot without interfering with the leg or the dogholes.


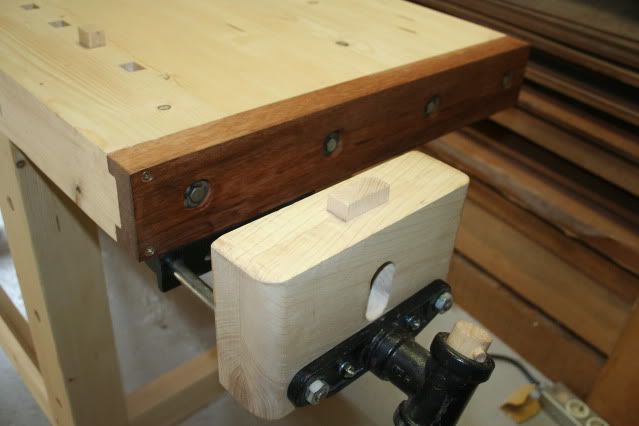
This is where it is going to end up, with the rear jaw behind that merbau endcap. And after some sawing and hacking it looks like this.


(one of the bolt holes is out of commision from now on). The line of the dogholes is slightly off centered, so I can reach between the screw in the centre and the guiding rod on the left to push up the dogs. My Record doesn't have a moving dog and it would have been too low anyway. So I made a rear jaw from bits of oak with a hole in the middle for a wooden dog. I also made provision for a wooden spring which gives a bit of friction to the dog, so it doesn't fall down on its own accord. The dog has an extension downwards which fits in between the centre screw and the guiding rod to let me push the dog upwards.


Next where the dogs for the bench. I have made one dog in the past which fits all the dogholes. But that one is to long for the two dogholes nearest to the endvise. The room under the bench is now occupied by the rods and screw mechanism. So I had to make two short ones from some leftover bits of ash.


Reaching between the bars I can push the dog upwards.


And this is the new endvise in use. I am very happy with it allready. It racks and sags a lot less then the old one. And this vise has a quick release which is very nice to move the rearjaw back and forth in a hurry.


As usual, a small job taking more time then envisioned, but it was totally worth it.

Sunday, February 15, 2015

Handplaning: From the floor up.

Lately Derek Cohen published an interesting article on his website about planing ergonomics. One thing I took from that article was how you push the plane in a heavy(ish) cut with your whole body, not just your arms or shoulders. Ideally you want to keep your elbow low and push with the forearm alomst horizontally.

So, I watched some videos from myself. I can highly endorse to shoot a video when you want to improve a physical skill. That can be humbling, but it is also very instructional. I could see that I am pushing from my legs and hips, but not neccessarilly holding my forearm horizontal. There is room for improvement, so to speak. Pushing from the legs in a heavy cut feels very natural, so I guess most people will do that automatically.

But these videos were done in the old shop with the wooden floor. I have now moved into the garage with a slick painted concrete floor, and it is very slippery indeed! I was preparing some beech blanks for a wild idea to make a plane in the near future. I was really struggling. Beech is hard stuff and I was gliding all over the place. Almost instinctively I was hooking my feet around the legs of the bench, not really an ideal solution.

Good reason to throw some money at the problem and I got an anti skid mat. Instant 100% improvement!


I choose for 60cm width and 250 cm length, bought from http://www.mattenzaak.nl.

Planing works a lot better this way. The next step up though are my shoes. I really like to wear clogs, because I can quickly jump in and out of them when leaving or entering the house. With normal shoes it is easy to drag around a lot of dust and shavings. Years ago I had clogs with an open heel and they are quite useless for planing, you just slip out of your clogs. Then I bought some clogs with a closed heel. Much better, but  they have a very high heel. My workbench is rather low, so the mat plus the clogs is pushing me up quite a bit. I'm still looking for a solution for that one.


Sunday, February 1, 2015

Mortising

I have been slacking again. My mind was occupied with skiing (loads of snow in the Alps) and I somehow never got around to do anything usefull in the workshop.

So, where did I left? Mortising chisels! This is how they turned out.


And how do they work? I only used the narrow 1/4" one, It's the long chisel on the right in the picture. I've cut four pretty deep mortises. The styles are 7 cm wide (almost 3") and I cut almost 5 cm deep. That is quite a bit and takes time. First round I don't get much deeper then 2.5 cm, and the deeper you get, the harder it is to get the waste out of the mortise.

I was a bit tentative. Usually I first plow the groove for the panel, that gives a nice start for the mortise. But I don't have any plow plane blade with the exact same width as these chisels. So I carefully start chopping, making sure to stay within the lines. Despite this tentativeness I managed to crack one corner allready! Luckily it was easy to repair with a bit of glue.

Here is my setup. The setup of a tentative men. A clamp on the front to prevent splitting. A holdfast to keep the style upright in its place. A caliper to measure the depth (not to the last 0.1 mm!, It's just a dandy measuring device). A narrower chisel to scoop out the waste. And two mallets, using the round one feels best.


The mortising chisel works very well. The enormous length is very usefull to keep square. The handle feels good and relaxed. The tapering of the blade helps to prevent the chisel getting stuck, but it doesn't feel too loose at all. The bevel is fine as it is and the edge is very durable in this stuff. No chipped corners or folding edge or whatever. I quickly sharpened one time, just to prevent mishaps, rather then to correct them.

And this is the result. Four nice mortises. It's a pitty they won't be visible in the final product.....