Instagram

Monday, December 28, 2015

Another neat little detail

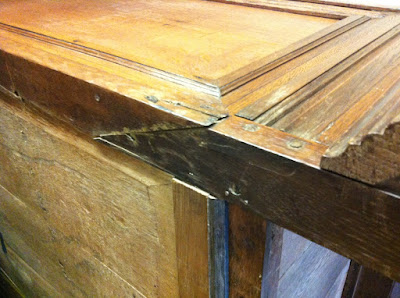
Peter Follansbee was helpfull with another little detail he writes about On his blog. You often find scratch stock "mouldings" not running the entire length of a board. Often used to flank a panel, for example in my case on the styles. A moulding running the entire length of the style, adjacent to the panel would be way to long and look out of place above and under the panel. So it fades in gradually, becomes full depth along the panel and fades out again when it reaches the other side. A picture makes it more clear I hope.


And more in detail.


I think it looks awesome! You can also see the very simple decorative pattern in the style. At  first I wasn't so happy how that one turned out, but somehow it looks much better in the door, then lying flat on the bench.

Peter Follansbee is often mentioned in my blog when I wrtite about this furniture style. He certainly is one of the well knowns experts in this field. I am not too familiar with all the names in furniture history study, so there could be many more names. But his study was especially about the HOW and WHY and that makes it so usefull for us woodworkers. I don't think he ever wrote about making a spice chest like mine. Maybe it wasn't a very common item in New England back then in the 17th century? There sure are a lot of English examples.


Sunday, December 27, 2015

Finishing the door

I was determined to get the door of the cabinet finished this extra long christmas weekend. So in between the festivities, cooking dinners, entertaining the guests etc, I managed to squeak in some workshop time.

First job was chopping the lock mortise. No pictures from that job. I drilled a hole for chip clearance and then chopped until the lock fits. Not much more to say about that. The lock will be fitted from the front so the mortise looks like a big ugly hole at the moment.

Next job was fitting the panel in the frame. The panel is flat on the front (with the carvings of course), so needs to be bevelled at the back. Again, nothing special. I didn't take any pains to make it look nice and symetric, it only needs to fit. In the past this was a job often done with an axe! I am too much a coward for that, so I used a plane. I was afraid it would be very difficult to get the exact right fit, but it happens to be pretty easy. I marked the a hickness of the groove width, minus a little bit on the edges of the panel. Then beveled the panel until I reached these markings, Checked the fit and planed some more until the panel fitted the grooves completely. A quick  picture of the fitting proces.


A more difficult, or better said, a more adventurous job was drawboring the mortise and tenon joints of the door. I didn't want to use glue, just pegged M&T's. This method of building furniture is thousands of years old. Basicaly it is a hole drilled through the styles where the mortise is. A similar hole is drilled in the tenon but offset towards the shoulder of the tenon. When you drive an oak peg through the holes, the tenon is pulled very tightly into the mortise, making the shoulder fit as tight as possible. You'd better look up "drawboring" to find a better description.

First came the making of the pegs, Some straight grained oak was split with an axe and then shaved to more or less the right size. I use a dowel plate to make them truely round and to just the right size. My plate is a random piece of steel with a couple of graduated holes (large to small) drilled on the drill press. Don't let anyone tell you that it needs to be made from some special wondersteel. For a hobbyist this home made version will continue to work for a very long time. I used a pencil sharpened this time to point the pegs.


Then the nerve wracking action of driving the pegs home. If the offset in the tenon hole is too much, this doesn't really work, you can't drive the peg home and you risc breaking things, the peg in the first place. Luckily this happened only once, but next time I am going to use a little less offset with 6 mm pins. The one that broke was replace by a peg in a straight through hole with a little glue to keep it in place.

Here the pegs are shown before they were cut off.


And here is the door as it will be fitted in the cabinet. Now it really starts to look like something!


Thursday, December 24, 2015

Rome

Last weekend, my wife and I visited Rome for 4 days. That was one of the better city trips in my life! When you are still doubting if you should visit Rome, stop doubting and book a ticket. We booked a room through booking.com, Residenza Ave Roma on the boarder of the Tiber in the middle of the town. Heartily recommended.

Some quick Iphone shots.

The weather was brilliant. We got lucky.


Baroque churches on each and evert street corner. Not my first choice in art styles, but here they are magnificent. The St. Peter Basilica was very impressive, it's huge! Make sure you do the climb to the top of the dome too.


St. Peter himself.


And yes, they know ho to use a little bit of marble.


I liked this chair in the St. Angelo castle.


Of course, the pope needs one or two small money coffers.


And of course we visited antique Rome.


It was hard to write in straight lines back then too.


Hi fellow! Thanks for the visit.


Sunday, December 6, 2015

Oops!


This is one of the styles. I had planed a very shallow wide groove and started to gouge in some decorative cuts. Oops, there is a mortise in there!

So, one step forward, at least two steps backwards. I have allready made a new style, Wacked the two mortises and this time inserted the tennon in the hole before I started cutting with the gouges.

And that brings me to another point. I am not quite sure yet if I really like this decoration. When it lies flat on the table it is more 1970's popart then 1670's renaissance. But standing it up, the light works different and it looks a little better. It's also weird that I now have the fresh wood exposed in between the now almost a year old surfaces of the rest of the wood. It really needs a sunbath before it looks like I want it to look.


Monday, November 30, 2015

The scratch stock

After much hard thought about how I would decorate the rails and styles of the medicine cabinet's door, I got around to the scratch stock. As many times before it was mr. Follansbee who inspired me. He had a bunch of examples on his blog and I took one to reproduce.

A simple scratch stock is very easy to make. Just a length of wood with a fence build in on one side. A slit through the centre and some screws to clamp the blade tight in the slit.


The scratch blade is just a small part from an old saw, polished on both sides and the profile filed into the edge. I have hardened the blade (heat it to orange red and plunge it in water) but not tempered, so it remains very hard.

After some practice runs I made the profile on the rails of the door.


I ran a plow plane to make the groove in the middle and the scratch profile is scratched in on both sides.

Well, it did work, but it wasn't quite as easy as I thought it would be!
- Scratching is slow work! In fact, I never reached the top of the large round bulge and sneaked in a bit of sandpaper to finish the work.
- Scratch stocks love to chatter, light cuts are important, and even then... More sandpaper.
- The ends are very hard to do. I read in Follansbee's book that he does the scratch mouldings first and cuts the tenons later. My less then perfect ends would not have been a problem because they would have been cut off. Luckilly I still had some sandpaper around.

So, all in all, I should have choosen a much simpler profile for my first attempt.

But I did end up with two nicely deorated rails.


The styles will get another kind of treatment.

Saturday, November 28, 2015

What I did this Saterday

Another day in the Blacksmith shop. We made some tongs this time. And mine came out way better then the ones I made some  months ago. Still not quite up to the standard of our Blacksmith teacher, but still, he was impressed by our efforts. I also bought a hammer from him, specially made for me. That must be a first in my career, usually I am not much of a special tool buyer.

Wednesday, November 25, 2015

Hinges

Last year I allready bought hinges for the cabinet. I thought that they were a perfect antique design, but now I know a little more about blacksmithing, I recognise what they really are, cheaply stamped out of piece of sheetsteel with a rather bland shape.

I watched several videos about making hinges. Some examples:


Well, that didn't look too difficult (famous last words...). The most difficult part seemed to be the forge welding, especially because I allready have some failed forge welding experience behind me. But in the end, the welding proved to be the easy part! Just heat it up very very hot, and then very very quickly get it to the anvil and smash it. Oh, and using some real borax this time.

The really difficult part was shaping the hinge pin area. Small parts, loosing heat quickly and fidley manouvering with tongs. I had to dress up the result quite a bit with the file, but this is the result after a long afternoon of experimenting and actually making two halfs of two hinges. To be continued.


Sunday, November 22, 2015

Finally, finally, the carving is finished

All my readers have probably forgotten that I have a small cabinet in the works. But it is still underway. Today I finally finished the carving. And it didn't turn out too badly if I may say so.

A picture to prove that I actually do the carving myself and didn't buy a ready made panel from ebay.


As you can see I have the panel wedged between two dogs. This arrangement doesn't work too well, but I didn't want to nail it to my workbench. That was a method often used in the past and many carved panels have the nail holes in the corners to prove it.

Today I did the flower in the middle. The curves of the lobes are defined with gouges, the straight lines are made with a v-tool. Then the background is removed with shallow gouges, mostly #4's in my case. Mine have an edge with a nail profile which is very usefull for this kind of work because the corners can't damage the outlines.

Here with the background stippled with a punch. The rails and styles of the door still need a fair amount of work. I want to decorate them too and I must make a mortise for the lock.


Sunday, November 15, 2015

And the second blacksmithing lesson

Another day in Harderwijk at the blacksmithshop from Reinier Hoving. Here is my fellow trainee, Rob at one of the forge fires.


And here we are working as a team, using a hot chisel and a sledge for spliting a piece of iron. Watch those purdy pink aprons...


I feel like I made some major steps forward yesterday. Almost everything went a lot easier and more directly towards the right shape instead of faffing around, bending and rebending and overheating the iron in the mean time. Still plenty of beginners mistakes of course.

This is what I made. Some nails that still have an of center head. A hoisting hook and the big part is for a door. Not that I have a suitable door for this, but is a niece practice piece nonetheless.


Monday, November 9, 2015

Repair of the cabinet almost finished

The last week I tried to color the repair on the backleg to make it blend in as much as possible. And that quite displays my ineptitude at anything regarding finishing.


I started with oak stain, lots of it to make it darker. But it didn't want to, so I added some black stain. Then it became too yellowish, so I added some Mahogany stain. At the end I was fed up and put some oil on it, That colored the old wood way too dark. Oh wel, you can't be good at everything and this will be hiding in a dark corner, noone can see it. After drying I started to wax the entire cabinet.

This weekend I had my first blacksmith lessons. An entire Saterday banging on steel. This is the result. First lesson was making pointy ends in all kinds of variatiosn. There were leaves. S-hooks and a long window hook. A lot of fun, hard work and very much worth it.


And a picture of the shop. Next weekend again!


Tuesday, October 27, 2015

Repairing one of the back legs.

The lefthand rear leg has an old repair. A piece is spliced into the style and was fastened with a lot of nails. This is now very wobbly.


This pictures clearly shows the utility of nails in furniture restauration. They usually cause splits and more damage then they managed to repair.


I have removed this and cleaned up the crumbling remains of the wood around. As you can see, the tenon of the rail mostly dissapeared. I really hope there is still enough for a solid connection. I will put an extra block of wood behind this for extra stability.


And this is with the new leg attached, hide glue used this time and some extra bits of wood spliced in for extra stability. Everything clamped up.


An interesting detail. The carved deccoration on the panels is not integral with the panel itself. It is a second layer, applied to the surface of the panel. The detail is, they both have their own groove in the rails and styles, so those are double grooved.


The more I see from this cabinet, the more I think it is a forgery. I think the panels are original. They are made from very nice and very wide wainscot panels. That is truelly quartersawn wood with a nice ray fleck pattern. The carvings also look genuine. But they probably used these panels to make a new cabinet somewhere late nineteenth or early twentieth century. Until now I have only found one square nail, the rest is all wire nails, which came on the market in the late 19th century. First I thought these wire nails were only in the repaired sections, but they are everywhere, So, I rest my case...


Monday, October 26, 2015

Look, what landed in my shop?

Not much space left anymore!


This is a 17th century cabinet. It's called an "Utrechtse poorters kast". Translated into English that would be something like: a portal cabinet from Utrecht. The cabinet is from my mother in law who moved into an elderly home and had to downsize of course. It took quite a bit of  strugle to get it overhere, because these old pieces were certainly not designed to be moved around a lot. Add to that the tear and wear from the centuries and it becomes a vulnerable, heavy and large obstacle!

Here is how it looked like in its previous home.


It is an oak cabinet with carvings and some ebony veneered decorations. Very typical for that period, They came in various levels of trim, adapted to the wealth of the owner. This one is rather mudane (which fits me perfectly well). Stuff like this was often copied in the nineteenth century when all the neo styles were en vogue. So I could have landed my self a copy, just as well as the real thing, I am not enough of an expert to know for sure.

It needs a few repairs to the legs, mostly redoing older repairs. I am not going to do a lot though, keeping it original as much as possible.

Wednesday, October 21, 2015

Planing stop in use.

Tonight I had a burst of energy and enlarged the last doghole from my bench for the planing stop.

Drilling a couple of holes with brace and bit, then chopping with my now favorite Nooitgedagt chisels. For this kind of work they are perfect, sturdy and long.


Checking often with a square, I made the fit for the block of oak very tight. Roubo wants the piece of oak to be 1 foot long, I wouldn't know why, mine happens to be a little shorter. After drilling the hole and enlargening it to a tapered fit, I smashed the stop into the top of the block. I added a bit of relief for the teeth in the workbench top so the teeth can sink below the surface when not in use.

And that's how it works. I will have to practice to find the best way to use it.


Tuesday, October 20, 2015

A dovetail saw kit

Hurry up to Pedder's blog. He's got a dovetail saw kit with some international cooperation behind it. The screws are made by Andrea from Italy, the back and plate are mine (Holland) and the teeth are done by Pedder from Germany.

http://pedder-altedamenauskiel.blogspot.com/2015/10/international-saw-making_20.html


Monday, October 12, 2015

And a little bit of blacksmithing

On mondays I am usually at home, and because a lot of neighbours are at work, that is the perfect time for making noise and smoke. So I did a little blacksmithing again.

I tried to make a plane stop. This is an ancient design. In the workbench you make a large hole with a movable stop which can go up and down. In the top of that block you would have an iron hook with teeth, like I made today. (nr 5 and nr 6 in this drawing from Roubo)


This is the basic shape.


I didn't take pictures of the process, so I'll try to describe it. I take a length of 10 mm round, about 50 cm long. First I make the spike, that is a simple taper . Something that is still pretty hard for me. Making a regular taper ain't easy! Then with the taper sticking out beyond the far edge of the anvil I make half on/half off hamer strikes to define the head. The head becomes about half the thickness of the 10 mm rod. This is all with the steel still attached to the long bar, so I can hold it in my left hand, much easier then holding with tongs. I make the bend. I try to make the corner as square as possible, which also is difficult. After bending I cut it off with a hacksaw. The last step is spreading out the head with the fin of the hammer.

It is a simple object, but still took me three tries!

I finish the hook with files, and then it would look a bit like this in the workbench. I still have to make the wooden stop.


I also tried some forge welding. I was very proud about my first attempt, but on trying to pry it apart in the vise it proved to be not such a succes at all!