Instagram

Sunday, January 31, 2016

New try to make a jack plane

This time I went along with a lot more care. First I drilled down into the mortise with a forstner bit under the drill press. Then I started chiseling. The large hole makes the mortising a lot easier. It also makes it more precise. I did make sure to stay well within the layout lines this time, better to pair the sides later on.


Before continueing I made sure everything looked nice and square, just taking my time.


Then I put it under the drillpress again for the mouth. A simple setup. This helps to drill in the right direction and to drill straight! But before drilling I first marked out the outlines of the mouth with a chisel to avoid splintering.


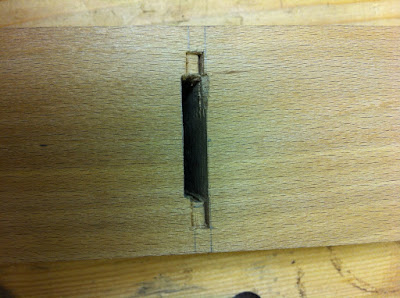
After drilling it's chiseling again. From the bottom, from the top. This is kind of difficult work due to the lack of space. But I got there slowly. After cleaning up al corners this is where I'm at. The bed doesn't look as nice as in the first plane, more work for later.


I did have a mishap. Despite taking care a small splinter broke free from the mouth. No idea why, but I suspect this wood isn't the best. It is a little spalty here and there. Luckily I say to myself again, It's just a jack plane.


Saturday, January 30, 2016

First plane: Fail

Nobody wished me luck. So that's probably the reason why I failed. I made about 3 critical mistakes, one is rather uncorrectable.

When drilling from the mouth up I stupidly didn't border the mouth with chisel strikes first. The result: splintering. I also touched with the drill chuck, resulting in a dimple in the sole. Both these caused an increase in mouth size. Not a critical failure in a jack plane, more cosmetic. The drilling also looked like a drunk had speared through the plane, I had to raise the wear angle to 90 degrees to get rid of all the drillbit damage.

In the picture you can see the damage around the mouth from carelessness.


But the deal breaking error happened during morising the mouth. The chisel wandered way too much to the outside and cut away too much in the area where the abutments are supposed to be. Easy to see the gap under to the wooden wedge template. I don't think I can save this, the hollow is just too much.


So, today I prepared another beech blank. My beech is really very close to final size, so I prepare it with handplanes. You can be a lot more carefull with a handplane then with the planer/thicknesser.

Checking with winding sticks.


I also made a "new" abutment saw today. I used a piece from an old panel saw, cut with the angle grinder and a thin cut off blade. Stick it in a piece of ash and shape it for comfort. The blade is attached with some M3 nuts and screws. All very simple. Removed all the set and sharpened it up, rip cut, zero degree rake angle. I tried it in the failed plane attempt, and it works very well. Slow, and it likes to bind in the cut, so I need to wax the blade, but it results in a very precise cut.


And then I got another cutting blade for the new plane. This one is a little wider, so I also wanted a little wider blade. I happened to have a 57 mm (2 1/4") blade where a previous owner had ground down the sides at the cutting end to something like 55 mm width. I finished that all the way to the top and added a bit of taper, so it now runs from 55 at the bottom to 54 at the top. Lots of grinding!

And here they are, waiting for more labour. (Why does my bench always look like a warzone?)


Sunday, January 24, 2016

Oh boy, wish me luck!


Just a small in between project, a beech jack plane. I allready made at least two stupid mistakes, but I keep telling myself, it is just a jack plane...

Tuesday, January 19, 2016

I'm sore!

The weather was great this weekend, cold but sunny and dry. I took the opportunity to cut down the cherry boards I bought last week. That gives me space in the shop and it hopefully helps to speed the drying process along.


I like to do the crosscuts with the handsaws, but rip cuts on this scale I prefer to do with the skill saw (sorry neighbours...), It's not very precise, but that isn't neccessary yet, I still leave them oversize  Handling large timbers like this is hard work. And I feel it. It's no fun when your body tells you are not fit for purpose. My back and my elbows hurt quit a bit.


I also did some resawing. Some of the 5 cm thick stuff is being resawed for quartered sticks for the door's rails and styles. I also still had some wallnut, mostly sapwood, that I resawed for the backpanels. This is kerfed from both sides on the table saw  and the web in between is removed with a rip saw. This went very well.


Luckilly there isn't much tension in these wallnut boards. I have clamped them tight to each other now. Maybe I should add some spacers in between the boards?

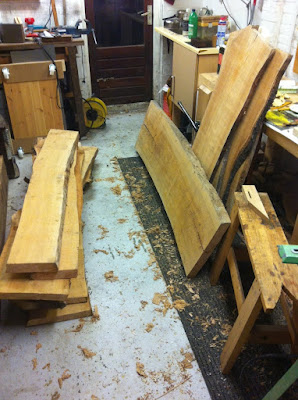
All the wider stuff is now stacked up in a spare room in the house. I want them to be dry, so I know what they end up to be. The narrower boards for all the styles and rails aren't so critical. I made sure they are quartered or rift sawn, so that helps to keep them in shape too. They are  stacked up in the shed.

I am not so sure about my wood choice yet. The boards come from three different trees. The wide ones are very nice, having an orange hue. The narrower stuff is very blond. And the thick boards I use for the legs and that I have resawn for the doors is pink. I hope everything mellows out a bit, cherry darkens very quickly in the sun.

Saturday, January 16, 2016

Pictures of the medicine chest

It is now finished. I soaked it in oil and coated it with three layers of furniture wax. Hopefully that will hold up for a while.


Start of the new project


Doesn't everyone start their new project with a bonfire?


(Burning the offcuts, I have been sawing cherry boards all afternoon long)

Tuesday, January 12, 2016

New cherry boards

Yesterday I visited a small sawyer in the north of The Netherlands, in Friesland to be precise. Inlands Hout they are called and they specialise in local wood, air dried. I may be a hopeless romantic, but I very much like the concept. They were very helpfull, and not overly expensive.

A carload, plenty much enough for the next project. They are around 17% now, so they will need some more time in the garage to reach equilibrium. In the evening I spent some time to draw out the various parts of what is going to be a bath room vanity (strange word for a bath room cabinet). It's also going to be loosely based on the 17th century English renaissance stuff.


Saturday, January 9, 2016

Installing the hardware

On the one hand this one of the nicest jobs of the build. At the other hand it is also nerve wracking. No time for mistakes anymore, no adjusting possible. It has to fit, right of the hammer so to speak.

First a simple job, a few small drawer pulls. I actually bought these things! They are made from brass, a little antiqued, with a screw on the end which screws into the drawer front. Problem is, there is no screwdriver slot or whatever, you just use your fingers. A little trick is to pre-thread the hole with a similar screw. A big trick is to use wax on the threads! And then screw it down in one go, no hesitation otherwise it binds immediately and is impossible to nudge further down.


The second piece of hardware is the lock. I allready chopped out the mortise in the front side of the beam, so it is simply a matter of drilling the pilot holes, drive in the nails and clinch them on the inside. That ain't going nowhere! Those nails btw are made in France and are good copies of blacksmith nails. They aren't even very expensive. They have a weird blueish coating, but that is quickly removed in some vinager.


The real nerve wrecking part of the day was installing the hinges. After carefull aligning and marking everything, I screwed the butterfly part inside the door style. These are the screws I made myself some time ago. I was very anxious that they would break when putting too much stress on them. I was also very anxious that I would drill the pilot holes all the way through the style and of course I was anxious that the whole door would end up hanging upside down and inside out or something like that. But it went along rather smoothly, luckily.


The other half of the hinge was nailed from the outside of the cabinet and clinched inside, but I see I forgot to take a picture of that. So that remains a surpise for now. See you next time.

Saturday, January 2, 2016

Hinges

In november I started to experiment to make myself some hinges. Folding a piece of sheetmetal over a form to start the right shape, fire welding the parts together and that's where I stopped. I used 2 mm steel in that example but I wasn't happy about how thick it was. So I restarted the proces with some 1.5 mm steel plate.

Fold it over the (very simple) form.


Weld them in the fire, no pictures from that, it is a bit hectic around the fire, not much time for making photo's. But here is the result, looks pretty rough still. The short pieces have been drawn out with the fin of the hammer to make a dovetail shape.


The welds certainly aren't perfect, but it is holding together well enough. The rest of the work is all taking place at the bench. Cutting with a hacksaw to define the shape of the houses.


The piece in the middel is removed with an interesting technique. First I hamer it flat on the corner of an anvil (lump of steel).


This makes room for the cold chisel to make a groove. When the groove is deep enough, a bit of wiggling breaks of this bit of steel easilly.


Then it is into the benchvise for filing and fitting.


The hinge pin is cut to length and riveted on the ends. The rest of the work is hacksawing and filing to an atractive old fashioned shape. Still need to drill some holes.