Instagram

Saturday, January 10, 2015

Unorthodox chisel grinding

In my possession are 4 typical Dutch mortise chisels. Two of them have allready been sharpened and used, but two were still waiting for some attention. I need a narrow one for the cabinet door, so this was a perfect moment. Problem is, the grinding angle they had was very obtuse, in the order of 40 to 45 degrees. They are the two right hand chisels in the picture. The two on the left are close to 30 degrees, which makes them perfectly allright. I drew a line on one of the misfits to show a 25 degree grinding angle.


As you can see, that is a lot of steel to remove. They are laminated chisels, but still quite hard, so filing wasn't an option. Even grinding would have taken a lot of time, and I don't want a hollow grind on them either. So I choose a rather unorthodox method, and a pretty radical one, the angle grinder!

Now, let me make one thing clear: Don't try this at home kids! It's a sure way to ruin a pair of fine chisels.

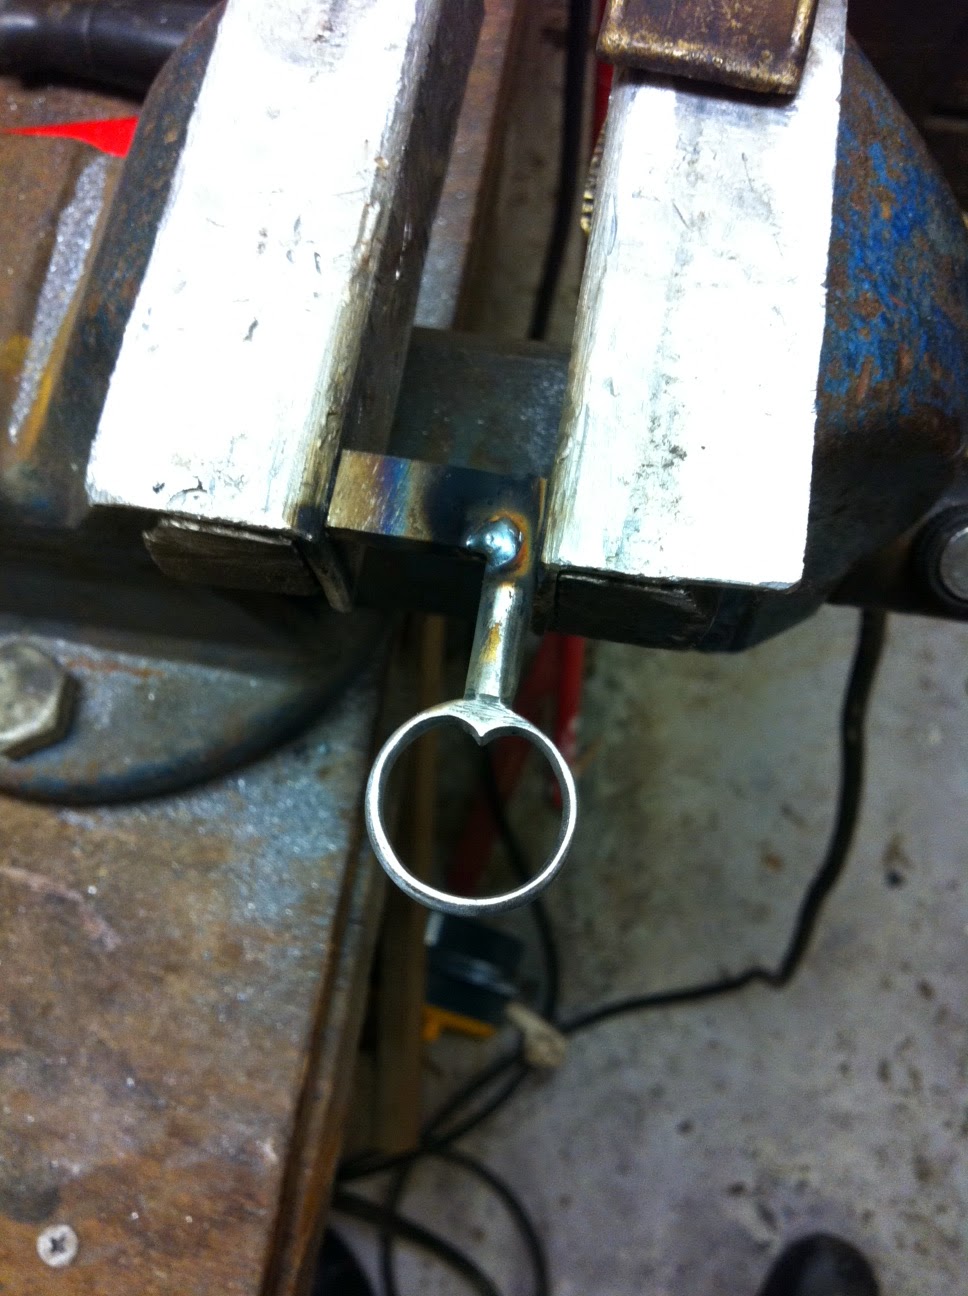
But being the reckless idiot that I am, I put them in a vise, got a very narrow cutoff blade and chopped a corner from the chisels. I made sure that I stayed away from the edge, put very little pressure on the grinder and took it slowly. Here the corner is still attached but one hit with a hammer was enough to seperate it from the rest.


Despite being very carefull I still decided to grind the edge back a few mm on the Cruessen bench grinder and proceeded to make a hollow grind. The hollow certainly not all the way to the edge, just enough to get a lot of metal out of the way. Then I grinded even more metal towards the heel of the bevel.


All this to remove as much metal as possible before I go to the next powertool, a belt sander. I don't have a professional one. Mine is a handheld model for wood, and I can't get metal cutting belts in this size. So I use a fresh 80 grit belt for sanding wooden and painted surfaces, clamp the sander upside down in the vise and start grinding the bevel.


It takes a while. I cool the chisel often in cold water and look carefully if it is keeping everything square, correcting as neccessary. I had another "puberty moment". This sander has been used for many jobs around the house, so it is rather filthy. And grinding steel produces sparks. One plus one is a smoking and very smelly sander! Time to dismantle it and clean out the mess.

But all this resulted in two 25 degree bevels, ready to be sharpened to usefull chisels on the wetstones. I will probably try a 30 degree secundairy bevel angle first to see how they hold up.


Friday, January 9, 2015

Humiliated

Just when I was a bit proud about my simple lock, I happened onto the website of Seth Gould, a master artisan/blacksmith somewhere in the US. Look at the details of this crab lock, especially how he manages to bring life into all the surfaces. Click on the image to get a better view.


Sunday, January 4, 2015

And the lock is finished!

In the last blog I finished the key mechanism, now it was time for the bolt. I had a somewhat thicker piece of steel, 1/4" thick from an old bracket. Cut it with the hacksaw (took some time!), then cleaned it up with files. Making the actuation gate for the key was done with hacksaw, angle grinder and files. It's easy to cut into a piece of steel with a hacksaw, but not so easy to turn a corner. I could use a turning saw with metal cutting blades, but blasting away the metal with the angle grinder is much quicker! Finishing down to the marking lines is a job for the files again.

The two ports for the bolt were made similarly with the same tools, this time from 4mm flat steel. The pins for rivetting are still too long in this picture.


I took my time to locate the positon of the ports and the holes carefully. Easy to make a stupid mistake here. Rivetting needs to be done with care. It's not a matter of squashing down the metal with mighty blows. You use the fin of the hammer to drive the steel into the countersink, working around the pin. The rivet shouldn't be too long, or it just bends over, or too short and it never fills the countersink. You need some practice. A good job means that you can almost make them disapear in the surface when you file them flat. I still need a lot of practice then...

This shows the mechanism with the key pushing the bolt into the closed position. I welded some blobs on top of the bolt and filed these so they act as a stop, preventing the bolt from ever falling out of the lock. I also added a leaf spring to put some tension on the bolt. You can also see that I am only a very average mechanic, but all this is going to live inside the door style. Most important, the lock works very smoothly.


And this is the front view.


And here is my little metal working corner. A sturdy vise. Hacksaw and a lot of files, I like the Bahco files. A drill press, and the Mig welder. When you are inspired to give it a try, but you don't have a welding rig, I think you could do a lot with rivetting and some silver soldering too. I am not quite sure about the key, but there probably is a different assembly method for that one too.


Saturday, January 3, 2015

Lock continued

Today I got time to do more work on the lock. It's very exiting work, completely different from woodworking of course, but a lot of fun. For more information about these antique locks, have a look on this website.

At work I could make the centre pin on the lathe. That's easier and more accurate then doing all work by filing. I also made a "bridge", a piece of sheetmetal bended into a U-shape where the locks innards are attached.

First I made the wards today. I take a piece of 4mm round steel and file a 3mm post at the end. I use the top of the vise to guide the file. This becomes a rivet.


I drill a hole in the bridge and countersink the outside. This is important, because when I clinch the rivet, the steel must flow into this countersink. Insert the rivet in the bridge and drive it flat with the fin of a hammer.


Turn it over, cut the rivet to length on the inside and shape the stub to a nice ward, an obstruction for the key.


This ward keeps a blank key from rotating, it's part of the security system of the lock.


I made another ward like this on the opposite side, that is in the face plate of the lock. I also made a ward from a piece of steel plate and welded this to the inside of one of the legs of the bridge. As you can probably see, I am an absolute lousy welder! I had to file a lot to make it passable.


With the centrepin also welded to the bridge and the whole bridge with wards riveted to the face plate it looks like this. As you can see I have filed the slots in the key bit so it can circumnavigate the wards.


So far the security system of this lock. You can probably guess that this isn't the most secure lock in the world. All these warded locks are pretty easy to pick. But for me it doesn't really matter, it's just a lot of fun.

Next job is the bolt and the ports to guide it.

Friday, January 2, 2015

Lock and key

It was probably not a very difficult guess, what I am going to make. I have decided that I want to make my own lock and key for the cabinet. Why would you say, I did allready buy all the hardware, didn't I? In retrospect, I wasn't very happy with that lock. It really looks too much like it is cheaply stamped out of a piece of sheetmetal, not like it was made by a 17th century lock smith. And that lock has to be mounted insde the door, while I was seeing all kinds of locks on old chests and boxes that are mounted to the outside.


To be honest, I didn't find many images of cabinets with the lock exposed like this. That seems to have been more of a medieval habbit. But I was allready on the path of no return. I had to make a lock and it had to be like this, mounted from the outside. I think (hope) it will look great.

So, how do you make a lock? Another catalyst to this decision was the book Medieval and Renaissance Furniture. I have ordered a digital copy and read it front to back. It has a good description of these types of locks and it looked pretty simple to me. I must say that I have some metal working experience, which helps. I even have a Mig welder, while not excatly a medieval tool, it is very usefull nonetheless.

In reality it's all a bit more work then anticipated, but that's normal. I think the key is the most difficult part, because it is very visible, so it needs to look nice. So I started with the key. No idea how they made it back then. I took a length of 6 mm round stock and some 2 mm flat bar, cut to about 6mm width. I bend the flat bar around a round bar of appropriate diameter, driving it tight with a hammer to a ring shape and cut out a 6 mm slot for the round keyshank. Then welded them both together, making sure I had a bunch of welding material build up around the joint so I could shape it to form. The rest was filing.

Today I welded the bit to the other end of the shank. I'm not a great welder and I also managed to trip the circuit breaker a few times, so this didn't proceed as fluently as welding the bow of the key. Filing was also more difficult, because I didn't have much room to swing the files. But it ended up none too bad. Luckily this side of the key is mostly hidden from sight. Here is a picture of my first welding attempt.


After filing all the lumps and after polishing with some fine sandpaper, it all doesn't look too bad. Not perfect, but keys and locks from that time usually had a distinct "handmade" look over them anyway.

And here is another picture of a nice lock on a gothic cupboard, showing how they made them very elaborate in those earlier times. Mine will be more plain (If everything works out!). I think the extra bolt is a later addition when the key was lost.


And here is another interesting link about these kinds of locks: Lock smithing

Thursday, January 1, 2015

A new endeavour.


What the heck is this going to be? Keeping everyone in suspense for a while. I hope to show a little more this weekend. For now things are shaping up nicely.